A dated Reconciliation Report should be created each month in order to ensure that all transactions are accounted for and verified with the monthly Bank Statement sent to you from your Bank. The Date on the Reconciliation Report created should match the END date of the Bank Statement. If the church has more than one bank account, then a NEW Reconciliation Report should be created for each bank account each month.
Viewing the Reconciliation Report: There are 2 ways to initially view the report
- Click REPORTS at the top of the Checkbook screen and then select RECONCILIATION REPORT. The most recent report will then be shown.
- If the Reconciliation Report is not visible, Double-Click inside the Reconciliation column (R?) on a transaction line in the Bank register.(see #4)
If a previously Reconciled transaction, then the report with that transaction will be shown. If the transaction was not Reconciled, then the most recent report will be shown. In either case, the Reconciled status of the transaction will not be changed at this point.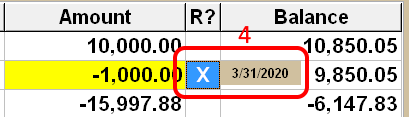
or
The Reconciliation Report will appear at the upper-left area of the screen
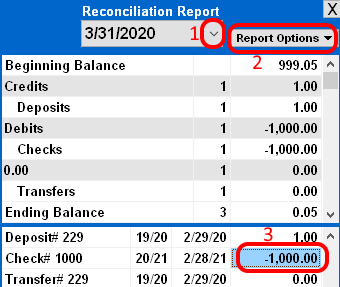
Selecting an existing Report: Click the Drop-down arrow next to the Date of the visible report and choose from the menu. (see #1)
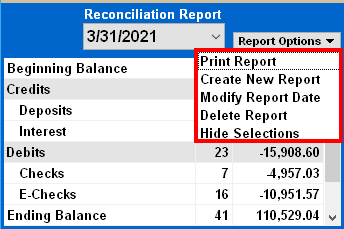
Creating a New Report: After receiving your Bank Statement each month, you will need to CREATE a NEW Reconciliation Report. Click the REPORT OPTIONS button (see #2), Click CREATE NEW REPORT, then Select the date for the New Report on the Calendar that will appear. This date should be the same as the END DATE of your Bank Statement.
To Reconcile/Un-Reconcile a transaction: Double-Click inside the R? column on the transaction line in the Bank Register.(see #4) This will add/remove the transaction on the Reconciliation Report and adjust the ENDING BALANCE. The AMOUNT and R? columns will appear in YELLOW when Reconciled.
To Modify the Report Date: If you need to change the date of an existing Report, Click the REPORT OPTIONS button (see #2), then click MODIFY REPORT DATE, then select the NEW date from the Calendar that appears. Do not choose this option if you need to Create a NEW Report.(see above)
When all transactions on the bank statement have been marked as reconciled, the ending balance on the report should match the ending balance on the bank statement. If the balances are different, then either the transactions on this Report do not EXACTLY match those on the Bank Statement, or the BEGINNING BALANCE does not match the Bank Statement and the problem originated on a PREVIOUS RECONCILIATION REPORT.
Selection Order Mode: To place the Report in a preferential order, Double-Click the line in the Report.
The line will be shown in green and move up the list below the last item Selected. Double-clicking the same line will un-Select.
Selections will not be saved after exiting the Report.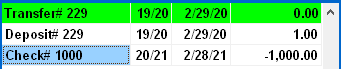
To Hide all Selections, click REPORT OPTIONS (see #2) and choose HIDE SELECTIONS. All transactions will be un-selected
(shown in white instead of green) and the list will return to normal order.
This will not affect the Reconciled status of the transactions.
To Show the Reconciliation Report Date for a transaction: Click the R? column on the transaction line in the Bank Register. A box will appear showing the Date Reconciled. (see #4)
Finding a Reconciled Transaction: Click on the line in the Reconciliation Report. The transaction will be located and hilited in the Bank register if it exists in the Fiscal Year displayed on screen. (see #3 & #4)
To Print the Report: Click the REPORT OPTIONS button, then click PRINT REPORT.
To Delete a Report: Click the REPORT OPTIONS button, then click DELETE REPORT.