The Periodic Financial Report is a comprehensive report which shows cumulative financial activity
and balances for the selected Fiscal Year and Period.
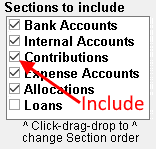
There are 6 Report Sections that can be Viewed and/or Printed. The Sections are:
- Bank Accounts
- Contributions
- Internal Accounts
- Allocations
- Expense Accounts
- Loans.
To View the Periodic Financial Report:
- Click Reports from either the Checkbook or Main Menu screens.
- Click Periodic Financial Report.
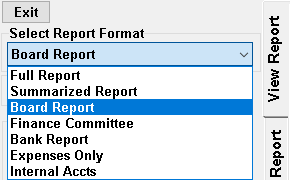
- Select the applicable Report Format from the Drop-down menu in the upper-left area of the screen.
This Menu contains 2 Built-in Report Formats along with Customized User defined Formats.
The 2 built-in Report Formats are:
Full Report: Shows all financial areas and details.
Summarized Report: Shows condensed information for specific financial categories. - Select the FISCAL YEAR by clicking the Left or Right arrows next to "Fiscal Year".
- Specify the Current Period Report Date Range by:
Selecting from the Drop-down Month list
- OR -
Clicking on START DATE or END DATE and choosing from the pop-up Calendar. - Select Section Tabs to view the Report Sections. (located at top of window)

To Customize Report Settings:
Many Settings options may be specified in order to result in the desired format and presentation. The User may save multiple Setting Formats that can then be easily recalled on the Report Format Menu.
- Click the SETUP REPORTS vertical Tab

- Select the desired Report Format from the Report Formats Drop-down Menu. - OR -
- To ADD a NEW REPORT FORMAT
click the New Report Format button and then Type the preferred Report Name. - Specify which Sections to INCLUDE by Checking/Clicking or Un-Checking the Sections in the "Sections to Include" box.
- Specify the ORDER in which Sections are shown by clicking,dragging and dropping the Section Names up or down the "Sections to Include" box.
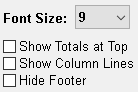
- Font Size: Choose the desired Text Size from the drop-down Font Size menu. This setting will be used for both the On-screen and Printed reports.
- Show Totals at Top: Select this box to show the Section/sub-section Totals above the Rows rather than below them.
- Show Column Lines: Select this box to print Vertical lines between the columns on the PRINTED Report ONLY.
- Hide Footer: Selecting this box will remove the logo at the bottom-right of the PRINTED Report.
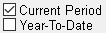
- Current Period: Select this box to include data for the Current Period only. This will result in a separate Column or sub-Section in each Section.
- Year-to-Date: Select this box to include data for the entire Fiscal Year. This will result in a separate Column or sub-Section in each Section.
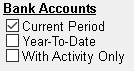
- Bank Accounts Section:
- With Activity Only: Select this box to only include Bank Accounts that have transactions in the selected Period.
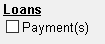
- Loans Section:
- Payments: Select this box to include column(s) for Payments made in selected Period.
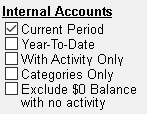
- Internal Accounts Section:
- With Activity Only: Select this box to only include Internal Accounts that have transactions in the selected Period.
- Categories Only: Select this box to only show Category summary rows. Account Rows will not be shown.
- Exclude $0 Balance with no activity: Select this option to prevent showing Internal Accounts that have a $0.00 balance and that do not have any transactions in the selected Period.
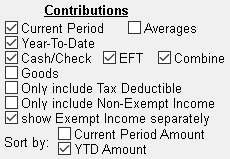
- Contributions Section:
- Averages: Select this box to show a separate column of Averages for the selected Period
- Cash/Check: Select this box to show a sub-Section that includes Fund Total Summaries for Donations made by Cash, Check or equivalent.
- EFT: Select this box to show a sub-Section that includes Fund Total Summaries for Donations made by Electronic means such as online, Credit or Debit Cards.
- Combine: Select this box to combine the Cash/Check and EFT sub-Sections.
- Goods: Select this box to show a sub-Section that includes donations of Goods.
- Only Include Tax-Deductible: Select this box to ONLY show Fund Total Summaries for Tax-Deductible Donations.
- ONLY Include Non-Exempt Income: Select this box to ONLY show Fund Total Summaries for Donations that were NOT marked as "Income Exempt".
- Show Exempt Income Separately: Select this box to show a separate sub-Section Summary for Donations marked as "Income Exempt".
- Sort by: The Fund Total Summaries can be shown in Current Period Amount Order, Year-to-Date Amount Order or Normal Fund List Order based on box selection.
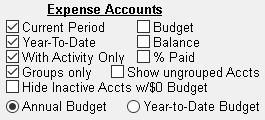
- Expense Accounts Section:
- The Budget, Balance and % Paid columns will be shown based on these Box selections.
- Activity Only: Select this box to ONLY include Expense Accounts that have transaction activity in the selected Period.
- Groups Only: Select this box to ONLY include Expense Category and Group Rows. Expense Account Rows will NOT be shown.
- Hide Accts w/$0 Budget and No Activity: Select this box to exclude unused Accounts.
- Annual Budget: Select this box to show Budget Amounts for the entire Fiscal Year.
- Year-to-Date Budget: Select this box to show proportional Budget Amounts.
- Only Include Selected Internal Category/Account(s):Click the Circle, then Select one or more Internal Categories or Accounts from this drop-down menu in order to limit the information shown in the Bank, Internal and Expense Accounts Sections to ONLY include transactions posted to the selected Categories/Accounts. To select multiple Rows, hold down the Shift or Ctrl key when clicking.
- Only Include Selected Bank Account(s):Click the Circle, then Select one or more Bank Accounts from this drop-down menu in order to limit the information shown in the Bank, Internal and Expense Accounts Sections to ONLY include transactions posted to the selected Accounts. To select multiple Rows, hold down the Shift or Ctrl key when clicking.

Expand/Collapse Feature:
Use this feature to Collapse or Expand specific Internal or Expense Categories, Groups or Loans
in their Sections. This is useful when only Totals are needed for a sub-Section.
To use this Feature:
- Click the VIEW REPORTS Vertical tab.
- Double-click Column 1 of a Category, Group or Loan Name row. The "+" or "-" at the beginning of the Row indicates the current Collapsed state.
- Double-click again to reverse the action.

To Print the Report:
- Click the View Report Vertical tab.
- Click the Print button.
To Delete the Report Format:
- Click the Setup Report Vertical tab.
- Click the Delete Report button.
For more information see: