The Schedule can be used to remind you to Post transactions that are recurring. This feature works for Checks, E-Payments, Deposits, Interest and both Internal and Bank Transfers.

After filling out a Transaction on the Checkbook window and before saving it, Click the "Add To Schedule?" button above the "Save Changes" Button. A Schedule box, (see above), will appear. To schedule the transaction for a future date:
- Type in a description of the Transaction in the Description box.
- Select the Frequency of the recurring transaction. The default setting is Monthly. To change the frequency, click on the Frequency box and select a different frequency.
- In the "Next Due Date" box, specify the date. Click OK to save the reminder to the Schedule.
Optionally, you can Add a transaction to the schedule without entering it into the checkbook.
- From the Checkbook screen, click the Schedule button.
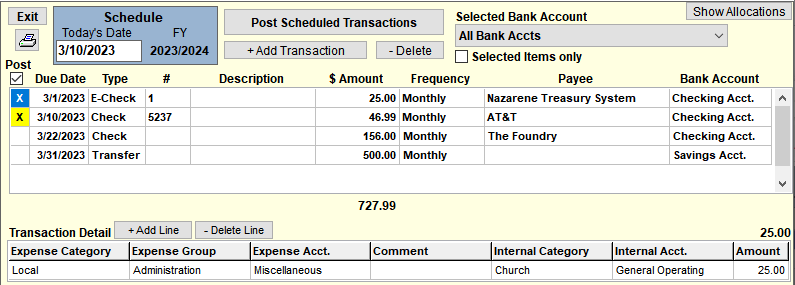
- Click the Add Transaction button and then click on the type of transaction you want to add.
- Fill out the Due Date, Type, Description, $ Amount, Frequency, Payee (if applicable) and Bank Account(s).
-
Click the
 button to add Transaction Detail
line(s). Fill out the transaction detail just as you would if entering on the
checkbook register. (not needed for Bank Transfers)
button to add Transaction Detail
line(s). Fill out the transaction detail just as you would if entering on the
checkbook register. (not needed for Bank Transfers) - After entering the information, exit the Schedule screen. The transaction will be automatically saved.
To View the Schedule:
When opening the Checkbook screen, the Schedule screen (see above) will appear if
one or more transactions are due and the Option "Auto-Open When Due" is checked. To manually open the Schedule,
click the SCHEDULE button at the top of the window.
To Post Scheduled transactions:
- Transactions highlighted in yellow are Due to be Posted and show "X" in the Post column. Double- click in the "Post" column to Select or Un-select transactions..
- To Select or Un-Select ALL transactions, Check/UnCheck the box above the Post column.
- Verify the "Post Date" at the top of the Schedule screen. This will be the date that the transaction(s) will be dated in the Check Register unless the "Post on Due Date" box is checked. All transactions Due on or before this date will be selected. If the "Post on Due Date" box is checked, then the transactions will be posted on their individual Due Date.
- A Transaction # will be assigned to each selected transaction. This # may be changed by the user.
- Transaction Detail Expense and Internal Accts as well as $ Amounts may be changed at any time before Posting.
- Click the "Post Scheduled Transactions" button to Post the selected transactions to the Checkbook.
- Click the Exit button to EXIT the Schedule and return to the Checkbook Register window.
To print a list of Scheduled Transactions, click the  in the upper-left area of the window.
If there is a problem with a Scheduled transaction which prevents it from Posting, a portion of the Row will be red. This usually is caused by missing or invalid information.
To only view Scheduled Transactions for a specific Bank Account, select the Bank Account in the drop down list at the top of the window.