How do I setup checks for printing?


    1. NTS Version 5.60 and above: From the Checkbook screen, click Setup and then Check Printing or E-Check Printing.
    2. NTS Version 5.56 and below: From the Checkbook screen, select a check from the transaction register by clicking on the check. Click the Print button. The green print selection box will appear. Click the Print Checks button to get to the Check Printing Setup screen.
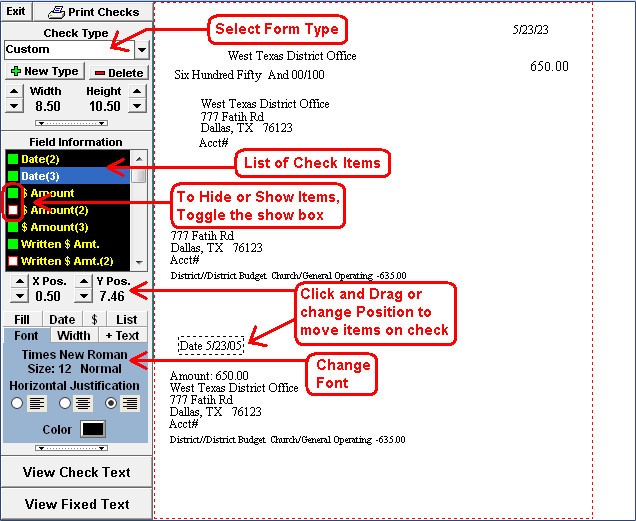
  1. Select the Check Type that best fits your checks (See the illustration below). There are eleven built in types. The first six are compatible with Quickbooks checks. You can order these checks through any check provider.
    • 3 per pg.-Dlx#080974 :  3 checks on a page with lines. This format is compatible with checks for Quickbooks of the same format. If ordering from Deluxe, this is check #080974.
    • 3 per pg.-Dlx#080003 :  3 checks on a page without lines. This format is compatible with checks for Quickbooks of the same format. If ordering from Deluxe, this is check #080003.
    • Chk +2 Stb-Dlx#080971 :  One top check with 2 stubs below with lines. This format is compatible with checks for Quickbooks of the same format. If ordering from Deluxe, this is check #080971.
    • Chk +2 Stb-Dlx#081064 :  One top check with 2 stubs below without lines. This format is compatible with checks for Quickbooks of the same format. If ordering from Deluxe, this is check #081064.
    • 3 per pg.-Dlx#080968 :  3 wallet size checks on a page with lines. This format is compatible with checks for Quickbooks of the same format. If ordering from Deluxe, this is check #080968.
    • 3 per pg.-Dlx#080935 :  3 wallet size checks on a page without lines. This format is compatible with checks for Quickbooks of the same format. If ordering from Deluxe, this is check #080935.
    • Default:  A single check, 8.5" × 3.5" (inches).
    • HP Single Check:  A single check, 8.5" × 3.5" setup for some HP printers, and most printers when the check is fed into the printer sideways.
    • 3-per-page :  3 checks on a page (paper size is 8.5" × 11").
    • Check + 2 stubs :  A single check at the top of an 8.5" × 11" page with two stubs below.
    • Check + 2 copies :  A single check at the top of an 8.5" × 11" page with two copies of the check below. (Not a common option)
  2. After selecting the option that most closely fits your checks, click the Print Checks button. Print the check on a blank piece of paper, not an actual check. If you choose a check format with 3 checks on a page, a row and column selection will appear below the print button. Leave the default choice as 1 and 1. Click OK.
  3. After the check prints, a box will pop up asking, "Would you like to Save the changes made to the form type 'Form Name'?" Click OK.
  4. Compare what was printed with a check. If you are using one of the first 6 formats listed and the corresponding check type, everything should line up and you can skip to step 10. Otherwise, one or more items on the check may need to be adjusted so that everything is in the right location. Click the Print button again to return to the setup screen.
  5. To move text on the page that is not in the correct location, there are two methods:
    1. Click and drag. First, click on the line of information you need to move. A dashed box will appear around the text indicating that it is selected. Click and drag the item to the correct location on the check.
    2. Use X and Y positions. First, click on the line of information you need to move. A dashed box will appear around the text indicating that it is selected. Find the X and Y position settings, which are located near the bottom of the side bar. The X and Y position settings are in inches. See illustration below.
      1. To move a line up or down, change the X position. To move a line down, increase the X position by clicking on the up arrow button. To move a line up, decrease the X position by clicking on the down arrow button.
      2. To move a line left or right, change the Y position. To move a line right, increase the Y position by clicking on the up arrow button. To move a line left, decrease the Y position by clicking on the down arrow button.

        Notes: The position setting is the distance between the item and the top or left margin of the page. Clicking on the up arrow button or the down arrow button will change the position setting by .05 inches. If you right click on the buttons, the setting will change by .01 inches.

  6. To change the font type or style, click on the expansion bar, , just above the View Check Text button. Click on the Font tab and then click on the font name or size. Make any changes necessary to the font and then click OK to save the changes. Changes made to the font only change the font for the item currently selected, and does not change the font for all parts of the check and/or stub.
  7. After making the necessary adjustments, click the Print Checks button again. Again, print on a blank piece of paper and not a check. Compare the print out with a check to see if any additional adjustments need to be made. Repeat steps 6, 7 and 8 as necessary.
  8. There may be some lines on the check that you do not want to print. To remove these lines, click on the line so that it is highlighted and then double click on the green box next to the line name in the black box. The box will turn white with a red outline indicating the line will not print. See illustration below.
  9. In some cases there may be items that are not being printed that you want to print on the check. Example, printing the payee's name and address on the check so that it can be seen through a windowed envelope.
    1. Find the item you would like to add to the check in the list of check items. It is the black box on the side bar. See the illustration below. Scroll through the box to find the item you are looking for.
    2. You may find an item listed multiple times. For example, Payee, Payee(2), and Payee(3). The item is listed multiple times so that it can be printed multiple times on a check or check stub. To add, for example, the payee name a second time to the check, scroll through the list until you find a Payee where the show box is off (a white box with a red outline.)
    3. Double click on the show box and it will turn green. The item will appear on the check with a dashed box around it.
    4. Move the item to the correct location on the check. See steps 6 and 7.
  10. Optional: Add text that is always printed on each check.
    1. Click the View Fixed Text button to add/remove fixed text.
    2. Type in the desired text in the Fixed Text Column, and press Enter to save the text. Click the Down arrow to add additional lines of text.
    3. See steps 6 and 7 to change the position of the fixed text or to change the font settings.
    4. Click the View Fixed Text button again or the small 'X' button in the upper left corner of the Fixed Text box to close the Fixed Text box.
  11. Once everything is printing correctly, checks can be printed.
For more information see:
Check Printing Setup Screen