Note: As of 2023, it is no longer necessary to order/purchase Blank 1099-NEC or 1096 Forms. The NTS software has been given permission from the IRS to print these Forms in their entirety.
-
From the Payroll screen, click on
 and then select the 1099-NEC/1096 Report option.
 -
If necessary, change the Payroll Year by clicking the arrow buttons on either side of the year:
 .
. -
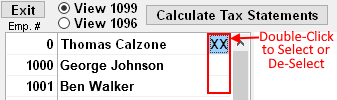
Self-employed and Contract laborers will automatically be selected to receive a 1099-NEC. To
select or de-select an Employee, double click on the Employee's name. "XX" will appear next to a Selected name.
-
To ADD a Vendor/Contractor from the Checkbook Payee list that needs to receive a 1099-NEC:
- Click the Add/Edit Vendors button. (below employee list)
- Select Payee(s) by Double-clicking the column to the left of the name.
- An "X" will appear next to the Payee name.
- After all selections are made, click the "X" button in the upper-right corner of the Payee window.
- Click the Calculate Tax Statements button.
- Click on Vendor name to VIEW the 1099-NEC information.
-
Verify that amounts and information are correct for each vendor. If changes need to be made,
click inside the applicable box and make changes accordingly. Verify that the Social Security #
of the vendor is correct in the box labeled RECIPIENT'S TIN.
NOTE: Changes made inside the form ONLY APPLY to the current session and are NOT permanently saved. - Verify that the Church Federal Employer Indentification #(EIN) is showing in the box labeled PAYER'S TIN, and the the Employer Name,Address and Phone are correct in the upper left box.
- The box labeled ACCOUNT # in the lower left can be left BLANK.
- Boxes 5,6 and 7 are not required by the IRS and can be left BLANK or $0.00.
-
To print the form, click the
 button.
- Select the Copies to Print by clicking the box to the left of each copy.
- Click the OK button
- Select the preferred Printer from the Printer dialog box and then click OK
View/Print Form 1096
- Click View 1096, at the top of the screen. The 1096 information is automatically calculated based on the cumulative 1099-NEC amounts.
- Make any changes necessary to the form by clicking the applicable box and editing as needed.
- Box 2 (labeled SOCIAL SECURITY NUMBER) should be left BLANK.
-
Click the button
- Select the preferred Printer from the Printer dialog box and then click OK
Disclaimer:
The information contained in this web page is of a general nature. It is not offered as specific
legal or tax "advice." Each person or organization should evaluate their own unique
situation in consultation with their local legal/tax advisors.