
- To Restore data, click the Backup/Restore icon on the NTS Main Menu screen.
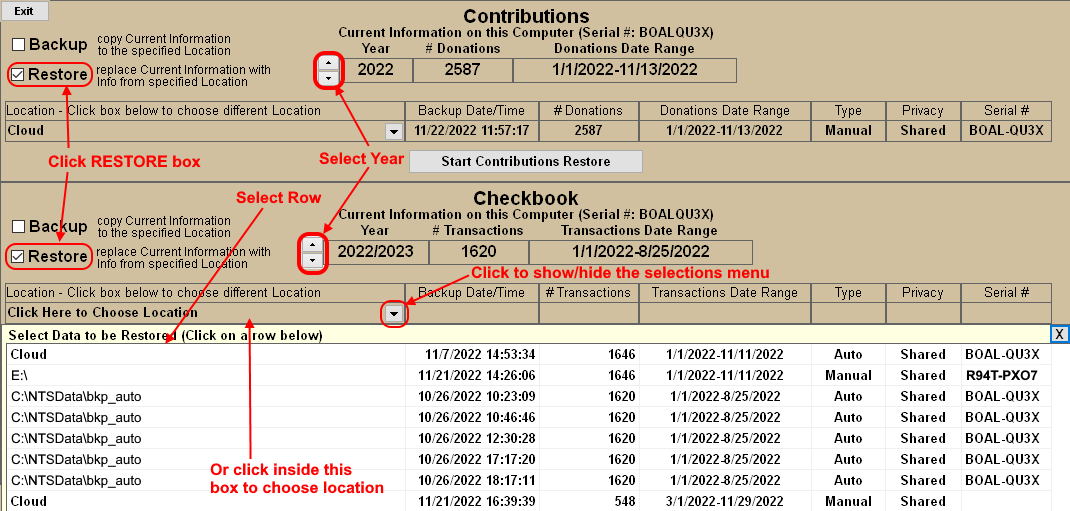
- If Restoring from a Contributions or Checkbook Backup, then select the applicable Year by clicking the up/down arrows.
- Click the RESTORE box in the upper-left corner of the Contributions, Checkbook or All Data boxes
in order to select the type of data to Restore.
One or more of these boxes may not be visible if the user does not have the necessary privileges.
Note: The ALL DATA option is used to REPLACE all of the NTS data on the computer.
- If restoring from a USB/flash or external drive, insert the device into the computer.
-
For each selection made above, specify the location where the data will be retrieved:
- Choose from the Previous Backups menu: If a list of previously made backups appears, then click on the desired location. The menu will disappear and the Backup information will appear at the bottom of the applicable box.
- To specify a Local location: Click inside the box below the word "Location". Next, a Folder selection dialog box will appear. Select the folder, then click OK.
- Click the "Start Restore" button at the bottom of each selected section. A progress bar will appear showing the status as the files are copied from the specified location.
- After files have been copied, the message "Restore Completed" should appear. The Backup Date/Time will
also update.
NOTES: When Restoring data, ALL of the current data for the selected
YEAR and Category (Contributions or Checkbook) on this computer is REPLACED by the selected Backup file data.
ie. if Restoring 2023 Contributions, the 2023 data
is completely deleted and then replaced with the data from the 2023 Contributions Backup file.
EXCEPTION: If the Contributions Specific Data Range ONLY option is selected, then ONLY the data within the Date Range
is replaced.
The ALL DATA option will REPLACE all NTS data files with those from the specified Backup file. This includes Contributions, Checkbook, Payroll, Check Schedule, Loans and many other user settings. This feature is often used when recovering from complete data loss or when installing NTS on a new computer. Using the ALL DATA backup option to keep two computers in sync with each other is NOT recommended if the user will be modifying data on both computers.
- How to Restore Data from a Backup[Video] [TEXT]
- Message "Files Missing" appears when attempting to Restore.
- Restore Error: The backup you have selected is an old backup and can not be used with this version.
- After I restore my data, I go the Contributions/Checkbook screen and nothing is there. I received the message that the restore was complete and no error messages. What do I do?