
- Click the Setup Report tab
- Choose Income Classification:
- by Account: Income will show based on Internal Account (Default option)
- by Comment: Income will show income based on Transaction Comment
- Choose "Separate Interest Line for Income" if you want RECEIVED Interest to appear on its own line.
- Choose "Separate Interest Line for Expense" if you want PAID Interest to appear on its own line. When this option is selected, the report looks for any Expense accounts that have the word "Interest" in the account name.
- Select classifying Expense Credits as either INCOME or EXPENSE by clicking the corresponding box.
- Specify Font Size by clicking Drop-down arrow. (default=10) Font Size is used for on-screen and printed Report.
- To RESET the Report back to Default settings, click the RESET REPORT button
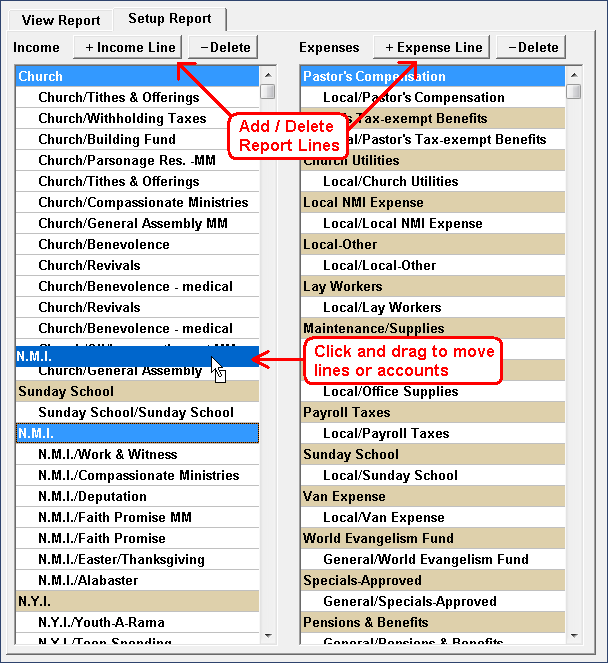
- User Specified Income and Expense Report Lines are the tan colored rows. Internal accounts/Income comments/Expense Groups/Accts appear as white lines.
- To Add an Income/Expense line, click the "Add Income" or "Add Expense" button and then type the desired name.
- To Delete an Income/Expense line, click Delete button at the top of the list.
- To Change the name of an Income/Expense line, click on the line and make changes.
- To Change the Order of the Income/Expense lines, Hold the LEFT mouse button down on the line and then drag it to the desired location and Drop/Release the Left button.
- To Move Accounts to different Report Lines, Click/Drag and Drop the Account to the desired Report Line.
- Click the "View Report" tab to see the updated report.

Can't find what you are looking for?
Click here to submit your question, contact us at
mail@ntssoftware.com or call us at (817) 318-0303.