This report displays a list of Transaction Detail lines that have been posted to the checkbook. Filtering Options can be set in order to display specific Transactions.
To Access The Transaction Detail Report:
From the Checkbook screen, click Reports, then Transaction Detail Report.
Filter Options: Set Filtering options at the TOP area of the screen. Selected filters will determine which Transactions are displayed and how they are displayed.
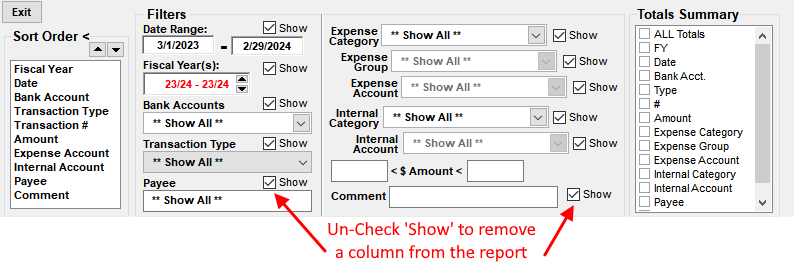
Sort Order: Transactions may be shown in a specific Order by using the SORT ORDER feature.
The Sort Order list shows the order that Transactions are displayed.
The Sort Order can be changed using one of the following methods:
The Sort Order can be changed using one of the following methods:
- Double-click any Column Title to Sort by that Column. Double-click a second time to reverse the Order. The Sort Order list will update accordingly.
- Click on a Field Name in the Sort Order box (ie. Payee).
- Click the Up/Down arrow button (to the Right of the List) to move the Field.
- Double-click the Field Name to reverse the Order. (ie. Payees displayed in reverse alphabetical order).
Date Range and Fiscal Year(s): To Specify a Date Range: Click either the Start or End Date and then
select the Date from the popup Calendar. If the Date Range includes more than one Fiscal Year, then the
corresponding Fiscal Year Range must also be set by hovering the mouse pointer over the Year and then
clicking the Up/Down arrow buttons next to the Year.
Bank Accounts: Select a BANK ACCOUNT by clicking the Bank Account box and choosing from the Drop-down
list.
Transaction Type: Select Type(s) by clicking the Transaction Types box and choosing from the Drop-down
list.
Payee: Select Payees(s) by clicking the Payee box and choosing from the Drop-down list.
To select more than one Payee, hold down the CTRL or SHIFT buttons on the keyboard while making selections.
Expense Category, Group and Account: Select an Expense Category, Group or
account by clicking the applicable box and choosing from the Drop-down list. In order to select an
Expense Account, the Expense Category and Group must first be selected.
Internal Category and Account: Use this filter like above.
$ Amount: To display transactions in a specific $ Amount Range, type an Amount in either
the <=$ Amount or $ Amount<= boxes, then press the ENTER key on the keyboard. To remove
the $ Amount filter, erase the Amount in the box. Remember, that Expenses are NEGATIVE Amounts.
Comment: Type one or more characters in the Comment box. Only Comments that begin with that text
will be included on the Report. This filter is NOT case sensitive.
Show Option: Next to each option/filter is a "Show" Option. You can hide a specific
column on the report by un-checking the Show box. For more information, please see the links
below.
Show Balance: The Balance Column can be shown when ONLY a single Expense Account or Internal Account
is selected. The Balance will reflect the running balance amount for that account.
Change Column Position: Click/Drag/Drop the Column Titles to the left or right.
Font Size: To change the size of the font on the screen, click the up/down arrow buttons
at the top of the report screen with the RIGHT mouse button. This does not affect the size of
the font on the printed report.
To Print: Click the Print button at the top of the screen. See the link below if your
report printout is too small to read.
To Export the report, see Export Reports for instructions.
To View Summarized Totals for Report Fields: see Transaction Detail Report
Totals instructions.
For more information see: