
There are 2 Primary Methods. In either case, first Select the Fiscal Year that the Check was Posted in on the Checkbook screen.
EXAMPLE: Check #8562 is Lost (Never Cashed):

- Method #1: VOID the Check or DELETE it. OR
- Method #2 Post an EXPENSE ADJUSTMENT transaction to offset the lost Check.
Expense Adjustment Entry
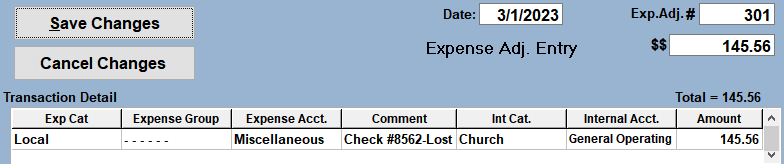
- Click the Expense Adjustment button
- Specify the DATE as the LAST DAY of that Fiscal Year
- Enter the same Amount as the Check Amount
- Post the Transaction DETAIL using the same Expense/Internal Accts as used on the Check
- Provide an applicable COMMENT
- SAVE the Changes
- Select the Current Fiscal Year
- You will then be prompted to Automatically Update the Starting Balances carried forward from
the Previous Year, answer YES.
If the Start Balances do not automatically update, then you will need to Manually adjust them. - NOTE: Do not mark the transaction(s) as "Reconciled", since they did not clear the Bank.
- PAYROLL NOTE: There are special considerations for dealing with Payroll Checks if Federal or State/Local Forms have been filed for the Period that includes the Check Date. If you are unsure about how to handle this, contact us and we will assist.