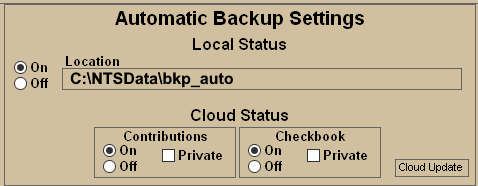
The Automatic Backup feature is designed to make a Backup of the user's data on an as-needed basis.
If Contributions or Checkbook changes have been made in the current session, then an Automatic
Backup will be made when the user EXITS those screens if this feature is turned ON.
These Backups can be made to a Local Location, to the Cloud, or both. If the CLOUD option is turned ON,
then other users may be able to RESTORE from these Backups. (if PRIVATE option is not selected)
The Cloud Automatic Backup feature is ONLY AVAILABLE to Software Service Plan subscribers.
- From the Main Menu, click the Backup/Restore icon.
- The Automatic Backup Setting box will appear at the lower area of the Backup screen. If you do not see this box, then you may not have the necessary user privileges.